Today I have a pretty, subtle glitter gradient nail art for you. I did this one because I needed something simple for an occasion I had but I wanted to have some glitter or something to it besides just the plain color. Now don't get me wrong, I love this color, it's very beautiful but I just wanted a little something extra for this mani.
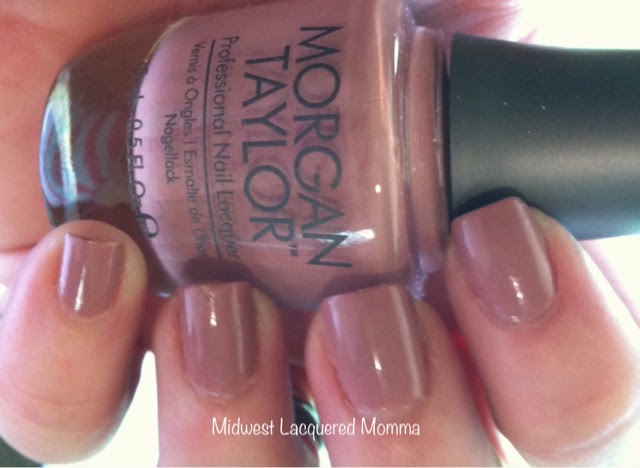
My base is Morgan Taylor Coming Up Roses, which is a pinky mauve nude. I really love this shade and actually have something very similar in Zoya as well. This is one of my favorite colors so I can never have too many of it.
Then once my 2 coats of Coming Up Roses was dry I took a basic cosmetic wedge and brushed on a little bit of Pure Ice Spit Fire. Spit Fire is a glitter topper that has pink, silver, and holographic micro glitter in it, it's such a beautiful color.
Then I dabbed on the coated cosmetic wedge on a paper towel to just get rid of a little of the excess and dabbed it across the tips and a little down the nail towards the cuticle. I reapplied some more glitter to the cosmetic wedge and applied more to the tips. I repeated this process until I got the desired coverage I wanted. Since I didn't want a real prominent glitter gradient I didn't have to do too many applications. I repeated this to all my nails and then once I was all finished I topped it all off with Out The Door to seal it in and give it all shine.
Pure Ice polishes can be purchased at Walmart for $1.97 in store and online. These are very reasonable prices for a good quality polish. They also have a nice range of colors and treatments (topcoats and basecoats). You can check out my review of Morgan Taylor Coming Up Roses here.
Showing posts with label Pure Ice. Show all posts
Tuesday, July 15, 2014
Thursday, April 24, 2014
Colorful Glitter Gradient
Today I have a fun little mani that I did recently. I was having a hard time deciding what to do for my mani and then it was starting to get late in the day and I knew that I had to hurry up and decide on my mani so I could get it done with plenty of time left to do what few household chores I had left to do. I don't know what it is but lately it has just been so crazy busy that it really feels like there isn't enough hours in the day to do what I want to do.
On to the mani.....
I started out with a base color of Zoya "Rue" from the Naturel Collection. I just love this rosy nude. It is just so perfect when you want a dash of color. This cream applies so smoothly and evenly that even with the shaky hands I had while doing this I was still able to achieve perfection in 2 effortless coats of Rue. Now to just allow it to dry, which for me is hard to be patient sometimes but I took it as an opportunity to relax and watch some TV while this dried (although it didn't take too long to dry so I didn't get much TV watching in, lol).
Once Rue was dry I thought I'd try something a little different out for my glitter gradients. Usually I use a make up wedge for applying the glitter for my gradients but I wanted to try something I had seen another blogger did (@margarita_onthe_rocks from Instagram did a video tutorial for this application technique). I took out one of the small double ended eyeshadow applicators (you know, just like the ones that come in eyeshadows) and brushed my glitter on the sponge applicator and dabbed away on my nails. The glitter I used is Pure Ice "It's Complicated" and I picked it up on my last trip to Walmart. It's Complicated is a mix of multi-colored hex glitters in various sizes. Once I got the glitter placed how I wanted with the eyeshadow applicator I applied a top coat of Out The Door to seal everything in!
Zoya polishes can be purchased from Ulta stores, select salons, and Zoya's site here. They retail for $9 for a 0.5fl oz bottle. Pure Ice polishes can be purchased at your local Walmart and retail for $1.96.
On to the mani.....
I started out with a base color of Zoya "Rue" from the Naturel Collection. I just love this rosy nude. It is just so perfect when you want a dash of color. This cream applies so smoothly and evenly that even with the shaky hands I had while doing this I was still able to achieve perfection in 2 effortless coats of Rue. Now to just allow it to dry, which for me is hard to be patient sometimes but I took it as an opportunity to relax and watch some TV while this dried (although it didn't take too long to dry so I didn't get much TV watching in, lol).
Once Rue was dry I thought I'd try something a little different out for my glitter gradients. Usually I use a make up wedge for applying the glitter for my gradients but I wanted to try something I had seen another blogger did (@margarita_onthe_rocks from Instagram did a video tutorial for this application technique). I took out one of the small double ended eyeshadow applicators (you know, just like the ones that come in eyeshadows) and brushed my glitter on the sponge applicator and dabbed away on my nails. The glitter I used is Pure Ice "It's Complicated" and I picked it up on my last trip to Walmart. It's Complicated is a mix of multi-colored hex glitters in various sizes. Once I got the glitter placed how I wanted with the eyeshadow applicator I applied a top coat of Out The Door to seal everything in!
Zoya polishes can be purchased from Ulta stores, select salons, and Zoya's site here. They retail for $9 for a 0.5fl oz bottle. Pure Ice polishes can be purchased at your local Walmart and retail for $1.96.
Thursday, March 20, 2014
Pure Ice Nail Polish Skittlette
I wanted to show you this really cute skittlette mani I did. Now, I'm still perfecting doing gradients so I was actually pleased with the way this turned out even though it still has room for improvement. Next up on the list of practicing and perfecting is water marbles. I can't wait to get those down!
I used a couple colors I picked up at WalMart. Scream! is the gorgeous teal cream that went on so smoothly with no streaking and it wasn't gloopy. The silver is called Beware and these are both from Pure Ice. I love when I can find a good formula in a bargain polish! I will be going back for more colors soon! The black is Zoya Raven which I've used many times and absolutely love this black.
I used 2 coats of both Scream! and Raven and 3 coats of Beware (the silver glitter). I wasn't sure if the teal was going to stain so I doubled up on my base coat just in case. I am actually still wearing this mani so I can't tell you if it stained or not but I'm pretty confident with 2 coats of base coat I won't have any staining.
For the really cute chevrons on my ring fingers I ordered Nail Vinyls from @teismom on Instagram. You can go to her site and order them from her, it's www.nailvinyls.com and she has a bunch of different designs. She also has cute vinyls for your phone, stash, or car in different sayings. I'm thinking of getting one of her super cute holographic ones for the back of my phone case. I also just ordered a few more nail vinyls from her to do more nail art.
These ones I used are the mini chevrons. When you use the nail vinyls you put down your base color and make sure that you let it dry completely before applying the nail vinyl. Then lay down your nail vinyl in the way you want your design. Make sure it is secure to the nail and there's now spaces because if there's spaces when you paint the next color on it will get under the vinyl. Then you paint over the entire nail and vinyl with the next color you want (I used the Beware as the base and Scream! as the over color) and remove the nail vinyl immediately. Allow to dry and top coat as usual! Easy Peasy!!
Here's a pic of my dominant or "cinderella" hand to show that I didn't do too bad on this hand either. I think I'm getting pretty good and doing art with my non-dominant hand.
I used a couple colors I picked up at WalMart. Scream! is the gorgeous teal cream that went on so smoothly with no streaking and it wasn't gloopy. The silver is called Beware and these are both from Pure Ice. I love when I can find a good formula in a bargain polish! I will be going back for more colors soon! The black is Zoya Raven which I've used many times and absolutely love this black.
I used 2 coats of both Scream! and Raven and 3 coats of Beware (the silver glitter). I wasn't sure if the teal was going to stain so I doubled up on my base coat just in case. I am actually still wearing this mani so I can't tell you if it stained or not but I'm pretty confident with 2 coats of base coat I won't have any staining.
For the really cute chevrons on my ring fingers I ordered Nail Vinyls from @teismom on Instagram. You can go to her site and order them from her, it's www.nailvinyls.com and she has a bunch of different designs. She also has cute vinyls for your phone, stash, or car in different sayings. I'm thinking of getting one of her super cute holographic ones for the back of my phone case. I also just ordered a few more nail vinyls from her to do more nail art.
These ones I used are the mini chevrons. When you use the nail vinyls you put down your base color and make sure that you let it dry completely before applying the nail vinyl. Then lay down your nail vinyl in the way you want your design. Make sure it is secure to the nail and there's now spaces because if there's spaces when you paint the next color on it will get under the vinyl. Then you paint over the entire nail and vinyl with the next color you want (I used the Beware as the base and Scream! as the over color) and remove the nail vinyl immediately. Allow to dry and top coat as usual! Easy Peasy!!
Here's a pic of my dominant or "cinderella" hand to show that I didn't do too bad on this hand either. I think I'm getting pretty good and doing art with my non-dominant hand.
Tuesday, January 21, 2014
Cute & Sparkly Skittlette
Here's a cute skittlette mani that I've been sporting for a few days. I thought I'd share it with all of you! I seen something just like it on Instagram by someone else and thought it was so cute that I had to do it myself.
I started out with Essie's Naughty Nautical on my thumb, pointer finger, and pinky finger.
Then I added Cult Nails Nevermore to my ring finger. BTW, I LOVE this black, it is the perfect one coater black. It's so shiny and glossy too, just the perfect black and for someone like me who loves dark colors, this is the holy grail of blacks!
Then I wanted some sparkle, I added Pure Ice Beware to my middle finger. This is a fine silver glitter and I used 3 coats to achieve the desired look. Also just to let you know how fine it is, I only had to add 2 thin coats of topcoat to get this one nice and smooth! Amazing!!
Then I took the Pure Ice Beware, Essie Naughty Nautical, and Cult Nails Tempest (which is an amazing almost one coat self-leveling white) to make the dots on my ring finger. And on the thumb I used Tempest, Nevermore, and Beware to make the flower. So here is the finished product. I hope you love it as much as I do!!
I started out with Essie's Naughty Nautical on my thumb, pointer finger, and pinky finger.
Then I added Cult Nails Nevermore to my ring finger. BTW, I LOVE this black, it is the perfect one coater black. It's so shiny and glossy too, just the perfect black and for someone like me who loves dark colors, this is the holy grail of blacks!
Then I wanted some sparkle, I added Pure Ice Beware to my middle finger. This is a fine silver glitter and I used 3 coats to achieve the desired look. Also just to let you know how fine it is, I only had to add 2 thin coats of topcoat to get this one nice and smooth! Amazing!!
Then I took the Pure Ice Beware, Essie Naughty Nautical, and Cult Nails Tempest (which is an amazing almost one coat self-leveling white) to make the dots on my ring finger. And on the thumb I used Tempest, Nevermore, and Beware to make the flower. So here is the finished product. I hope you love it as much as I do!!
Tuesday, November 5, 2013
Mom's Glitter Gradient NOTD
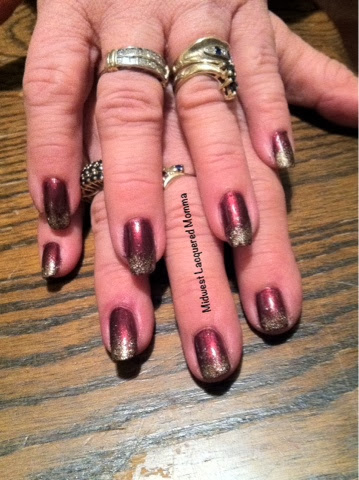
For Mom's mani this week we went with something kind of simple. She sent me a couple pictures of what she wanted and this is the one we settled on for this week. Next time we are going to try one of the other ones she found.
We started with a base of OPI Diva from Geneva and then using a make up sponge I sponged on Pure Ice Bare It All ( a gold micro glitter) to create this glitter gradient. Once we added a top coat of Out The Door it really sparkled. The formula on the OPI was very good and dried very well in an average amount of time.
Doing this mani for Mom gave me an idea for one I am going to do for the Christmas holiday season. I can't wait to show it to you!!
OPI polishes can be purchased at Ulta, Target, Sally Beauty, salons, and other beauty supply stores.
Pure Ice polishes can be purchased at your local Walmart.
We started with a base of OPI Diva from Geneva and then using a make up sponge I sponged on Pure Ice Bare It All ( a gold micro glitter) to create this glitter gradient. Once we added a top coat of Out The Door it really sparkled. The formula on the OPI was very good and dried very well in an average amount of time.
Doing this mani for Mom gave me an idea for one I am going to do for the Christmas holiday season. I can't wait to show it to you!!
OPI polishes can be purchased at Ulta, Target, Sally Beauty, salons, and other beauty supply stores.
Pure Ice polishes can be purchased at your local Walmart.
Subscribe to:
Posts (Atom)